Ingredients
For the Peanut Butter Base
- 2 cups (about 200 g) finely crushed digestive biscuits or graham crackers
- 1 cup (250 g) smooth peanut butter
- ½ cup (115 g) unsalted butter, melted
- 1½ cups (180 g) powdered sugar
- 1 teaspoon vanilla extract
- ¼ teaspoon salt
For the Chocolate Topping
- 1½ cups (255 g) semisweet chocolate chips
- ¼ cup (60 g) smooth peanut butter
- 1 tablespoon coconut oil or unsalted butter, optional
Optional Garnishes
- Chopped roasted peanuts
- Flaky sea salt
- Mini chocolate chips
- Peanut butter drizzle
- Melted white chocolate
Instructions
1. Prepare the Pan
Start by preparing an 8 × 8-inch or 9 × 9-inch square baking pan.
Line the pan with parchment paper, leaving some extra paper hanging over two sides.
The overhanging parchment will act as handles and make it much easier to lift the chilled bars from the pan later.
Lightly grease the parchment if desired.
2. Crush the Biscuits
Place the digestive biscuits or graham crackers in a food processor.
Pulse until they become very fine crumbs.
If you don’t have a food processor, place the biscuits in a sealed food bag and crush them with a rolling pin.
The finer the crumbs, the more firmly the peanut butter base will hold together.
Measure approximately 2 cups of crumbs before proceeding.
3. Make the Peanut Butter Mixture
Place the melted butter and peanut butter in a large mixing bowl.
Stir until smooth and completely combined.
Add the powdered sugar, vanilla extract, and salt.
Mix thoroughly.
The mixture should become thick and creamy.
4. Add the Biscuit Crumbs
Add the crushed biscuits gradually.
Stir until all of the crumbs are coated with the peanut butter mixture.
The finished mixture should resemble a thick, soft dough.
If it seems too dry and crumbly, add another tablespoon of peanut butter.
If it seems unusually soft, add a few additional biscuit crumbs.
5. Press the Base Into the Pan
Transfer the peanut butter mixture to the prepared pan.
Use the back of a spoon, spatula, or flat-bottomed glass to press it firmly and evenly across the entire pan.
Take your time with this step.
A firmly packed base will produce clean, sturdy bars that are easier to slice.
Try to make the surface as level as possible.
6. Chill the Base
Place the pan in the refrigerator for approximately 20–30 minutes while you prepare the chocolate topping.
Chilling the base helps it firm up and prevents the warm chocolate from blending into the peanut butter layer.
7. Prepare the Chocolate Topping
Place the chocolate chips and ¼ cup peanut butter in a microwave-safe bowl.
Heat in 20–30 second intervals, stirring thoroughly after each interval.
Continue until the chocolate is mostly melted.
Stir until completely smooth.
If desired, add 1 tablespoon of coconut oil or butter to make the topping slightly softer and easier to cut.
Do not overheat the chocolate.
Alternatively, melt the chocolate and peanut butter together in a heatproof bowl over a saucepan of gently simmering water.
8. Add the Chocolate Layer
Remove the chilled peanut butter base from the refrigerator.
Pour the melted chocolate mixture over the top.
Use a spatula to spread it evenly from edge to edge.
For a decorative finish, drizzle a small amount of melted peanut butter over the chocolate.
Drag a toothpick or thin knife through the lines to create a simple marbled pattern.
9. Add Optional Garnishes
While the chocolate is still soft, sprinkle the surface with chopped roasted peanuts if desired.
A very small pinch of flaky sea salt can also enhance the chocolate and peanut butter flavors.
Don’t add too much salt because the peanut butter and biscuits already contain some salt.
10. Refrigerate Until Firm
Place the pan in the refrigerator for at least 2 hours, or until the chocolate topping and peanut butter layer are firm.
For the cleanest slices, refrigerate the bars overnight.
Avoid freezing them immediately after adding the chocolate because rapid chilling can sometimes cause the chocolate to develop a dull appearance or become difficult to slice.
11. Slice the Bars
Once completely chilled, lift the entire slab from the pan using the parchment-paper handles.
Place it on a cutting board.
Use a sharp knife to cut it into squares or rectangles.
For especially clean cuts, warm the knife under hot water, dry it thoroughly, and then slice.
Repeat between cuts.
Tips for Perfect Chocolate Peanut Butter Bars
Use creamy peanut butter. Natural peanut butter can work, but because it separates more easily, stir it thoroughly before measuring.
Crush the biscuits finely. Large pieces can make the base crumble when sliced.
Press the base firmly. A well-packed layer gives the bars a sturdy texture.
Don’t overheat the chocolate. Gentle melting produces a smoother topping.
Chill completely. The bars need sufficient time to firm up before slicing.
Use a warm knife. This helps create neat, professional-looking pieces.
Flavor Variations
Dark Chocolate Peanut Butter Bars
Use dark chocolate chips or chopped dark chocolate for a richer, less-sweet topping.
Milk Chocolate Version
Milk chocolate creates a sweeter, creamier topping that is especially popular with children.
Peanut Butter Swirl Bars
Reserve a tablespoon or two of peanut butter. Warm it slightly, drizzle it over the chocolate, and swirl with a toothpick.
Pretzel Peanut Butter Bars
Replace part of the biscuit crumbs with finely crushed salted pretzels for a sweet-and-salty flavor.
Coconut Peanut Butter Bars
Add ½ cup unsweetened shredded coconut to the peanut butter base.
Crunchy Peanut Butter Bars
Use crunchy peanut butter instead of smooth peanut butter for extra texture.
Espresso Chocolate Bars
Add ½ teaspoon instant espresso powder to the melted chocolate for a deeper chocolate flavor.
How to Serve
These bars are delicious straight from the refrigerator.
For a softer texture, let them sit at room temperature for approximately 5–10 minutes before serving.
Serve them with coffee, tea, cold milk, or a scoop of vanilla ice cream.
They also make an attractive addition to dessert platters. Cut them into smaller squares for parties or holiday gatherings.
Make-Ahead Instructions
Chocolate Peanut Butter Bars are excellent for making ahead.
Prepare them one or two days before serving and keep them covered in the refrigerator.
You can also freeze the finished bars.
Place parchment paper between individual pieces and store them in an airtight freezer-safe container.
Thaw them in the refrigerator before serving.
Storage
Store the bars in an airtight container in the refrigerator for up to approximately 1 week.
They can also be frozen for up to 2 months.
For the best texture, thaw frozen bars overnight in the refrigerator.
Because the recipe contains butter and peanut butter, keeping the bars chilled helps maintain their texture and freshness.
Frequently Asked Questions
Can I use almond butter?
Yes. Almond butter, cashew butter, or another nut butter can be substituted, although the flavor and texture will change.
Can I use powdered peanut butter?
It isn’t recommended as a direct replacement for regular peanut butter because the recipe relies on the fat and moisture in peanut butter to bind the base.
Why is my base falling apart?
The base may not have enough moisture or may not have been pressed firmly enough. Add a little more peanut butter and compact the mixture firmly in the pan.
Why is my chocolate topping cracking?
Very cold bars combined with a firm chocolate topping can make slicing difficult. Allow the bars to sit at room temperature for a few minutes before cutting, and use a warm knife.
Can I make these bars without coconut oil?
Absolutely. Coconut oil is optional. It simply helps make the chocolate topping slightly softer and easier to slice.
Final Thoughts
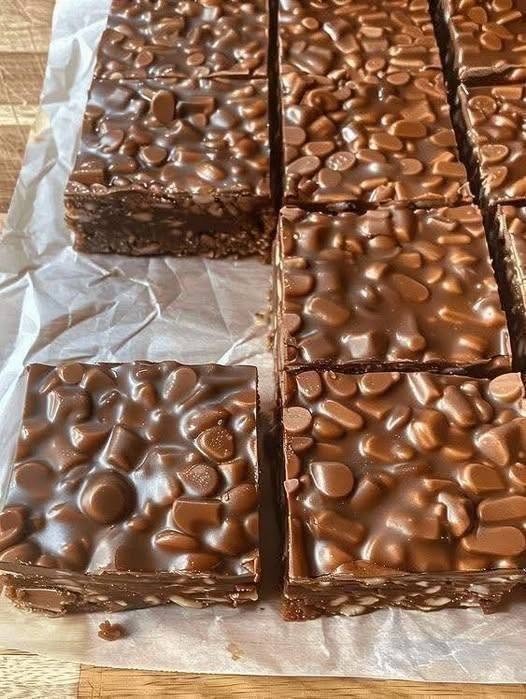
Chocolate Peanut Butter Bars are one of those simple desserts that deliver an incredible amount of flavor with very little effort. The combination of a sweet, buttery peanut butter biscuit base and rich chocolate topping creates a classic treat that is hard to resist.
Because the bars are no-bake, they’re especially convenient when you don’t want to turn on the oven. Prepare them ahead, chill them thoroughly, slice them into neat squares, and keep them refrigerated until you’re ready to serve.
Whether you’re making dessert for your family, preparing treats for a party, or simply satisfying a chocolate-and-peanut-butter craving, these bars are an easy recipe worth making again and again.
Prep time: 20 minutes
Chilling time: 2–3 hours
Total time: Approximately 2½–3½ hours
Servings: 16–20 bars
Difficulty: Easy

