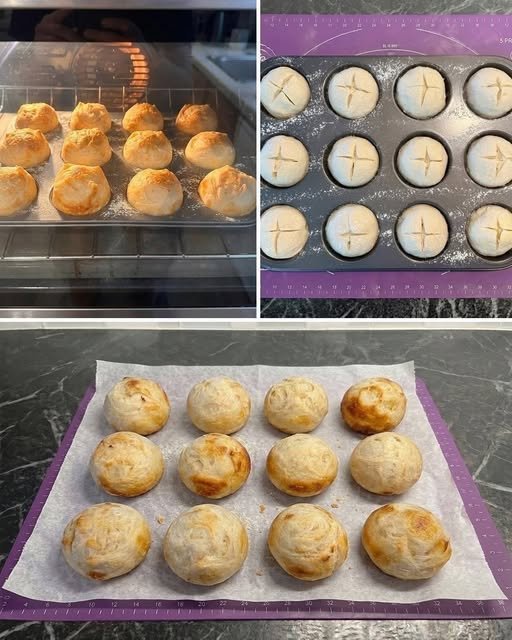
Ingredients
For the Dough
- 500 g bread flour
- 350 g water, room temperature
- 100 g active sourdough starter
- 10 g salt
- 15 g honey or sugar, optional
- 15 g olive oil or melted butter, optional
This recipe makes approximately 6–8 mini loaves, depending on the size you prefer.
Preparing the Sourdough Starter
Your starter should be active before beginning the recipe. Feed it several hours ahead of time and allow it to rise until it is bubbly and approximately doubled in volume.
A healthy starter should have a pleasant fermented aroma and contain plenty of bubbles throughout.
If your starter is sluggish, allow additional time for it to become active. The strength of your starter has a major effect on how quickly the dough ferments.
Mixing the Dough
Place the bread flour and water in a large mixing bowl.
Mix with a wooden spoon or your hands until no dry flour remains. The mixture will look rough and shaggy.
Cover the bowl and allow the flour and water to rest for approximately 30 minutes.
This resting period, often called an autolyse, allows the flour to absorb the water and begins gluten development.
After the rest, add the active sourdough starter.
If using honey and olive oil, add them at this stage as well.
Mix thoroughly until the starter is evenly distributed throughout the dough.
Finally, add the salt.
Work the dough with your hands for several minutes until it becomes more cohesive.
The dough will initially feel sticky, but resist the temptation to add large amounts of flour. Sourdough dough naturally has some stickiness, and excessive flour can result in dense loaves.
Developing the Dough
Cover the bowl and let the dough rest for approximately 30 minutes.
You will now perform a series of stretch-and-folds to strengthen the gluten.
With slightly wet hands, grab one side of the dough, stretch it upward without tearing it, and fold it over the center. Rotate the bowl and repeat on all four sides.
This is one set.
Perform approximately 3–4 sets, spaced about 30 minutes apart during the first 2 hours of fermentation.
As the dough develops, it should become smoother, stronger, and more elastic.
Bulk Fermentation
After the final stretch-and-fold, cover the dough and allow it to ferment at room temperature.
The fermentation time can vary considerably depending on the temperature of your kitchen and the activity of your starter.
Instead of relying only on the clock, look for signs that the dough is ready. It should become noticeably smoother and puffier, with bubbles developing along the sides or surface.
The dough may increase in volume by approximately 50–75 percent rather than necessarily doubling.
Avoid allowing it to ferment excessively, as over-fermented dough can become weak and difficult to shape.
Dividing the Dough
Lightly flour your work surface.
Turn the fermented dough onto the surface and gently divide it into 6–8 equal pieces.
Try to handle the dough gently so you do not completely remove the gas that has developed during fermentation.
For more uniform mini loaves, use a kitchen scale to weigh each portion.
Approximately 125–150 g per piece works well for small individual loaves.
Pre-Shaping
Take each piece and gently fold the edges toward the center.
Turn it over so the seam is underneath.
Using your cupped hands, gently drag the dough across the work surface to create surface tension.
Repeat with all portions.
Allow the pieces to rest uncovered for approximately 15–20 minutes.
This bench rest allows the gluten to relax, making final shaping easier.
Shaping the Mini Loaves
Shape each piece according to your preferred style.
For small round loaves, gently flatten each piece and fold the edges toward the center. Turn it over and use your hands to create a tight, smooth surface.
For oval loaves, stretch the dough gently into a rectangle, fold the top third toward the center, then fold the bottom third upward. Roll it gently into an oval and seal the seam.
Do not press the dough aggressively. The goal is to maintain some of the air created during fermentation.
Place the shaped loaves on parchment paper or a lightly floured cloth with space between them.
Final Proof
Cover the shaped loaves with a clean kitchen towel or lightly oiled plastic wrap.
Allow them to proof at room temperature until they become visibly puffy.
Depending on your starter and kitchen temperature, this may take approximately 1–3 hours.
For a deeper sourdough flavor, you can place the shaped loaves in the refrigerator and allow them to proof slowly overnight.
Cold fermentation also makes the dough easier to score and handle.
Preparing for Baking
Preheat your oven to 230°C (450°F).
Sourdough benefits from strong initial heat and plenty of steam.
If you have a Dutch oven large enough for several mini loaves, you can bake them inside it. Alternatively, bake them on a heavy baking tray or baking stone and create steam by placing a heatproof tray in the oven and adding hot water.
Carefully transfer the mini loaves to your baking surface.
Use a sharp bread lame or razor blade to make one shallow slash across the top of each loaf.
Scoring gives the expanding dough a controlled place to open during baking.
Baking the Mini Loaves
Place the loaves into the fully preheated oven.
Bake at 230°C (450°F) for approximately 15 minutes with steam.
Then reduce the temperature to 210°C (410°F) and continue baking for another 10–15 minutes.
The loaves should become deeply golden brown with a crisp crust.
If they are browning too quickly, reduce the oven temperature slightly.
The exact baking time depends on the size of your loaves, so watch the color and crust rather than relying only on the timer.
Cooling
Remove the mini loaves from the oven and transfer them to a wire rack.
Allow them to cool for at least 30–45 minutes before slicing.
Although the bread may smell irresistible, cutting it immediately can result in a gummy interior because the crumb continues to set as the loaf cools.
Once cool, listen for a crisp crust when you gently tap the bottom.
Serving Suggestions
Sourdough Loaftinis are delicious served warm with butter, olive oil, or your favorite spread.
They can also be used for:
- Mini sandwiches
- Breakfast toast
- Garlic bread
- Bruschetta
- Soup and stew
- Cheese and vegetable sandwiches
- Avocado toast
Because the loaves are individually sized, they are particularly convenient for packed lunches and picnics.
Helpful Tips
Use an active starter. A weak starter can result in slow fermentation and dense bread.
Do not add excessive flour during kneading or shaping. A slightly sticky dough generally produces a lighter loaf.
Watch the dough rather than the clock. Fermentation depends heavily on temperature and starter activity.
Keep the dough covered so it does not develop a dry skin.
For extra-crisp crusts, use plenty of steam during the first part of baking.
Allow the loaves to cool completely before storing.
Storage
Once completely cool, store the mini sourdough loaves in a paper bag or breathable bread container for up to a couple of days.
For longer storage, place the cooled loaves in airtight freezer bags and freeze them.
To serve, thaw at room temperature and refresh them in a hot oven for several minutes.
Final Result
Perfect Sourdough Loaftinis should have a deep golden, crisp crust and a soft, slightly chewy interior with small and medium-sized air pockets. Their natural fermentation gives them a pleasant tangy flavor without being overwhelmingly sour.
These mini loaves are a wonderful way to enjoy homemade sourdough in a smaller, more convenient format. Once you become comfortable with the basic recipe, experiment with additions such as roasted garlic, herbs, olives, cheese, seeds, or whole grains to create your own signature mini sourdough loaves.

