Ingredients
- 1 cup (225 g) unsalted butter, melted and slightly cooled
- 1 cup (200 g) packed light brown sugar
- ½ cup (100 g) granulated sugar
- 2 large eggs, room temperature
- 1 large egg yolk
- 2 teaspoons vanilla extract
- 2¼ cups (280 g) all-purpose flour
- 1 teaspoon baking soda
- ½ teaspoon salt
- 1½ cups (255 g) semi-sweet chocolate chips
- ½ cup (85 g) milk chocolate or dark chocolate chips, optional
- Flaky sea salt, for topping, optional
Instructions
1. Prepare the Baking Pan
Preheat your oven to 350°F (175°C).
Line a 9 × 13-inch baking pan with parchment paper, leaving some parchment hanging over the sides. These overhanging edges will make it much easier to lift the finished cookie bars from the pan.
Lightly grease the parchment with butter or nonstick cooking spray.
If you prefer thicker bars, you can use a slightly smaller pan, but the baking time may need to be adjusted.
2. Melt the Butter
Place the butter in a saucepan or microwave-safe bowl and melt it gently.
Allow the melted butter to cool for several minutes. It should still be liquid but not extremely hot.
Using melted butter rather than softened butter gives these bars a dense, chewy texture and makes the dough quick to prepare.
3. Combine the Sugars and Butter
Add the melted butter, brown sugar, and granulated sugar to a large mixing bowl.
Whisk until the mixture is smooth and well combined.
Brown sugar is particularly important for chewy cookie bars because its moisture helps keep the center soft.
4. Add the Eggs and Vanilla
Add the two eggs and one egg yolk.
Whisk until the mixture becomes smooth and slightly thickened.
The extra egg yolk adds richness and helps create a soft, chewy texture without making the bars cakey.
Add the vanilla extract and mix again.
5. Combine the Dry Ingredients
In a separate bowl, whisk together the all-purpose flour, baking soda, and salt.
Mixing the dry ingredients separately helps distribute the baking soda and salt evenly throughout the flour.
6. Make the Cookie Dough
Gradually add the dry ingredients to the wet mixture.
Use a spatula or wooden spoon to fold everything together until just combined.
Do not overmix. Stop as soon as you no longer see large streaks of dry flour.
Overmixing can develop too much gluten, which may make the cookie bars tougher rather than soft and chewy.
7. Add the Chocolate Chips
Fold approximately 1¼ cups of the chocolate chips into the dough.
Reserve the remaining chocolate chips for the top.
You can use semi-sweet chocolate chips for a balanced flavor, milk chocolate for a sweeter bar, or dark chocolate for a richer and more intense chocolate flavor.
For an especially indulgent result, use a combination of different types of chocolate.
8. Transfer the Dough to the Pan
Spoon the cookie dough into the prepared baking pan.
Use a spatula or your clean hands to spread the dough evenly from corner to corner.
The dough will be thick, so take your time smoothing the surface.
Scatter the reserved chocolate chips over the top and gently press them into the dough.
If desired, sprinkle a small amount of flaky sea salt over the surface. The salt helps balance the sweetness and makes the chocolate flavor stand out.
9. Bake
Place the pan in the preheated oven.
Bake for approximately 22–28 minutes.
The edges should be golden brown and set, while the center should still look slightly soft.
This is important: do not wait until the center looks completely firm. Cookie bars continue cooking from the residual heat after they come out of the oven.
For softer, chewier bars, remove them closer to the lower end of the baking range.
For firmer bars with more browned edges, bake a few minutes longer.
10. Cool Completely
Remove the pan from the oven and place it on a wire rack.
Allow the cookie bars to cool in the pan for at least 30–60 minutes.
If you cut them while they are very hot, the centers may appear undercooked and the bars can fall apart.
For the cleanest slices, allow them to cool completely.
Use the parchment paper to lift the entire slab from the pan, then place it on a cutting board.
Cut into squares or rectangles using a sharp knife.
Tips for Extra-Chewy Cookie Bars
Use brown sugar. Brown sugar contains more moisture than white sugar and helps create a chewy texture.
Don’t overbake. Slightly underdone-looking centers are ideal when the bars come out of the oven.
Measure flour carefully. Too much flour can make cookie bars dry and cakey. For the most accurate results, use a kitchen scale.
Don’t overmix. Mix only until the flour disappears.
Use quality chocolate. Chocolate makes up a significant part of this dessert, so good-quality chips or chopped chocolate can make a noticeable difference.
Cool before cutting. The texture continues to develop as the bars cool.
Delicious Variations
Triple Chocolate Cookie Bars
Use a combination of semi-sweet, milk, and white chocolate chips for an extra-rich dessert.
Peanut Butter Chocolate Chip Bars
Add ½ cup creamy peanut butter to the wet ingredients. Reduce the melted butter slightly if the dough becomes too soft.
Chocolate Walnut Bars
Fold ½–¾ cup chopped walnuts or pecans into the dough along with the chocolate chips.
Salted Caramel Bars
Add caramel chips to the dough and sprinkle flaky sea salt over the top before baking.
M&M Cookie Bars
Replace some of the chocolate chips with colorful chocolate candies for a fun party or children’s dessert.
How to Store
Store cooled cookie bars in an airtight container at room temperature for approximately 4–5 days.
Place parchment paper between layers if stacking them.
For longer storage, wrap the bars individually in plastic wrap and place them in a freezer-safe container or bag. Freeze for up to approximately 3 months.
Allow frozen bars to thaw at room temperature.
For a warm, gooey texture, microwave an individual bar for approximately 10–15 seconds before serving.
Serving Suggestions
These cookie bars are delicious on their own, but they become even more indulgent when served warm with a scoop of vanilla ice cream.
You can drizzle them with melted chocolate, caramel sauce, or peanut butter.
For a simple presentation, dust them lightly with powdered sugar after cooling.
They’re also perfect alongside a cup of coffee, tea, or cold milk.
Frequently Asked Questions
Why are my cookie bars cakey?
Too much flour, overmixing, or overbaking can make cookie bars cakey. Measure the flour carefully and remove the bars while the center is still slightly soft.
Can I use salted butter?
Yes. If using salted butter, reduce or omit the additional salt in the recipe.
Can I use a smaller pan?
Yes, but the bars will be thicker and require additional baking time. Watch the center carefully to avoid underbaking.
Can I use chopped chocolate instead of chocolate chips?
Absolutely. Chopped chocolate creates irregular pools of melted chocolate throughout the bars and can give them a bakery-style appearance.
Final Thoughts
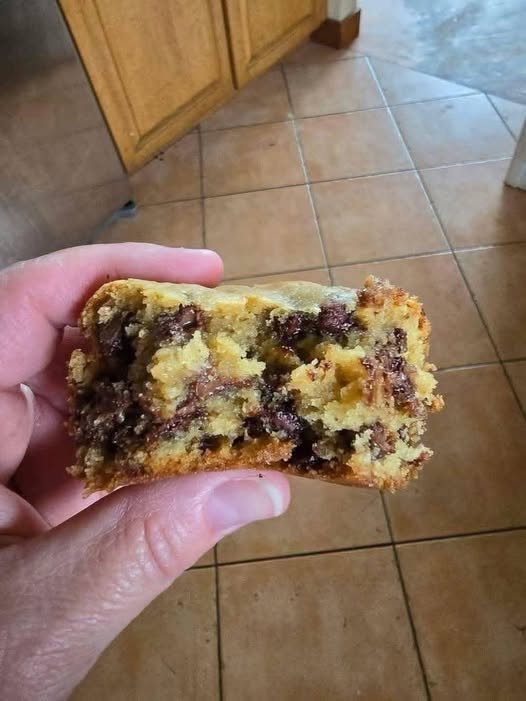
Chewy Chocolate Chip Cookie Bars are one of the easiest ways to enjoy classic homemade chocolate chip cookie flavor without preparing individual cookies. The combination of melted butter, brown sugar, eggs, vanilla, and chocolate produces rich, chewy bars with golden edges and a soft center.
The recipe is easy to customize with nuts, caramel, peanut butter, or different types of chocolate. Whether you’re making them for a family dessert, party, bake sale, or simply because you’re craving something sweet, these cookie bars are sure to disappear quickly.
Prep time: 15 minutes
Bake time: 22–28 minutes
Cooling time: 30–60 minutes
Total time: Approximately 1 hour 15 minutes
Yield: 20–24 bars
Difficulty: Easy

