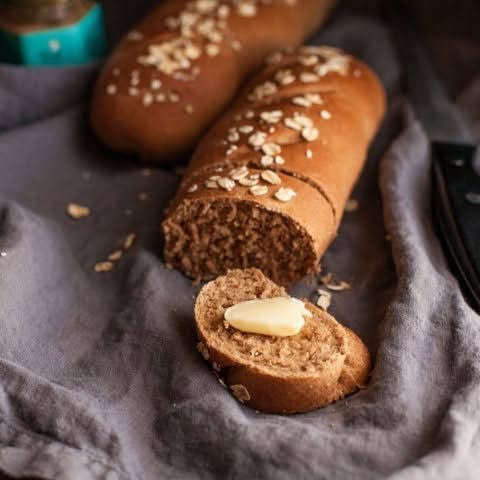
Ingredients
- 2 cups (240 g) whole wheat flour
- 2 cups (250 g) bread flour or all-purpose flour
- 1½ cups (360 ml) warm water
- 2 tablespoons honey or brown sugar
- 2¼ teaspoons (7 g) active dry yeast
- 1½ teaspoons salt
- 2 tablespoons vegetable oil or melted butter
- 2 tablespoons milk powder, optional
- 1 tablespoon wheat germ or ground flaxseed, optional
- 1 tablespoon rolled oats or sesame seeds, for topping, optional
Instructions
1. Activate the Yeast
Pour the warm water into a large mixing bowl. The water should be comfortably warm, approximately 105–110°F (40–43°C), rather than hot.
Add the honey or brown sugar and stir until dissolved. Sprinkle the yeast over the water and let it stand for approximately 5–10 minutes.
The mixture should become slightly foamy. This indicates that the yeast is active. If the yeast does not foam at all, it may be inactive, and starting again with fresh yeast is recommended.
2. Combine the Flours
In a separate bowl, combine the whole wheat flour, bread flour, salt, and milk powder if using.
Mix the dry ingredients thoroughly so the salt is evenly distributed.
Whole wheat flour contains more bran and germ than white flour, which gives brown bread its characteristic color, flavor, and hearty texture.
3. Make the Dough
Add the flour mixture gradually to the yeast mixture, stirring after each addition.
Add the vegetable oil or melted butter and continue mixing until a rough dough forms.
The dough may initially feel slightly sticky. This is normal. Avoid adding large amounts of flour immediately because whole wheat flour continues absorbing water as the dough rests.
Let the dough rest for approximately 10 minutes before kneading.
4. Knead the Dough
Transfer the dough to a lightly floured work surface.
Knead for approximately 8–12 minutes. Push the dough away from you with the heel of your hand, fold it back, turn it slightly, and repeat.
The dough should gradually become smoother and more elastic.
If it remains excessively sticky, add flour one tablespoon at a time. Try to use as little additional flour as possible because too much flour can make the finished bread heavy.
You can also use a stand mixer fitted with a dough hook. Knead on low to medium-low speed for approximately 7–9 minutes.
5. First Rise
Place the kneaded dough in a lightly greased bowl.
Turn the dough once so the surface is lightly coated with oil. Cover the bowl with plastic wrap, a lid, or a clean kitchen towel.
Place the bowl in a warm, draft-free area and let the dough rise for approximately 1–2 hours, or until it has roughly doubled in size.
The exact rising time depends on the temperature of your kitchen. A warm environment will generally make the dough rise faster.
6. Shape the Loaf
Once the dough has doubled, gently press it down to release excess air.
Transfer it to a lightly floured surface and shape it into a loaf.
Flatten the dough gently into a rectangle. Fold the sides toward the center and roll it tightly from one short end to the other.
Pinch the seam closed and place the loaf seam-side down in a greased 9 × 5-inch loaf pan.
You can also divide the dough into two smaller portions if you prefer smaller loaves.
7. Second Rise
Cover the loaf loosely with a clean kitchen towel and let it rise again for approximately 30–60 minutes.
The dough should become noticeably puffy and rise close to the top of the pan.
Avoid allowing it to rise excessively. An over-proofed loaf can collapse during baking or develop a weak structure.
While the loaf is proofing, preheat the oven to 375°F (190°C).
8. Add the Topping
For a rustic appearance, lightly brush the top of the loaf with water or milk.
Sprinkle with rolled oats, sesame seeds, sunflower seeds, or a small amount of wheat germ if desired.
You can also leave the loaf plain for a classic brown bread appearance.
For a more traditional bakery-style crust, make one shallow lengthwise slash across the top of the dough using a sharp knife.
9. Bake
Place the loaf in the preheated oven.
Bake for approximately 30–40 minutes, until the top is golden brown and the loaf sounds hollow when gently tapped.
If the top begins browning too quickly, loosely cover the bread with aluminum foil during the final 10–15 minutes.
For the most accurate result, the internal temperature of the bread should reach approximately 190–200°F (88–93°C).
Remove the loaf from the oven and let it cool in the pan for about 10 minutes.
Then remove it from the pan and place it on a wire rack.
10. Cool Before Slicing
Allow the bread to cool for at least 45–60 minutes before slicing.
Although warm homemade bread smells irresistible, cutting it too early can compress the crumb and make the interior seem gummy.
Once cooled, use a serrated bread knife to cut the loaf into even slices.
Tips for Soft Brown Bread
Don’t use too much flour. Whole wheat dough can feel sticky initially. Adding excessive flour creates a dense loaf.
Knead properly. Good gluten development helps the loaf rise and gives it a soft, flexible texture.
Give the dough enough time to rise. Watch the dough rather than following the clock exactly.
Use fresh yeast. Old yeast may not produce enough rise.
Don’t skip the resting periods. Resting allows the flour to hydrate and makes the dough easier to work with.
Brush with butter. For an especially soft crust, brush the warm loaf with a little butter immediately after baking.
Optional Additions
You can customize this brown bread with nutritious ingredients.
Add 2–3 tablespoons of sunflower seeds, pumpkin seeds, flaxseed, or chopped walnuts for extra texture.
A tablespoon of sesame seeds on top adds a pleasant nutty flavor.
For a sweeter breakfast loaf, increase the honey slightly and add a handful of raisins.
You can also add a teaspoon of cinnamon and a small amount of honey for a lightly sweet cinnamon brown bread.
Storage
Once completely cooled, store the bread in an airtight bread bag or container at room temperature for approximately 3–4 days.
For longer storage, slice the bread and place it in a freezer-safe bag. Frozen bread can be stored for approximately 2–3 months.
Individual slices can be removed from the freezer as needed and toasted directly.
Avoid storing homemade bread in the refrigerator unless necessary, because refrigeration can make bread stale more quickly.
Serving Suggestions
Fresh brown bread is delicious with butter, honey, peanut butter, jam, or cream cheese.
For breakfast, toast a couple of slices and top them with scrambled eggs, avocado, or your favorite spread.
The sturdy texture also makes it excellent for sandwiches. Try grilled chicken, turkey, cheese and vegetables, tuna salad, or a simple egg sandwich.
For a quick snack, toast a slice and spread it with peanut butter and banana.
Recipe Summary
This homemade Brown Bread Recipe creates a soft, hearty loaf with a pleasant whole-wheat flavor and a tender crumb. Combining whole wheat flour with bread or all-purpose flour keeps the loaf lighter than bread made entirely with whole wheat flour while still providing the characteristic flavor and color of brown bread.
With a little kneading, patience, and proper proofing, you can make a delicious homemade loaf that is perfect for everyday meals.
Prep time: 25 minutes
First rise: 1–2 hours
Second rise: 30–60 minutes
Baking time: 30–40 minutes
Total time: Approximately 2½–4 hours
Yield: 1 large loaf
Difficulty: Easy to intermediate

