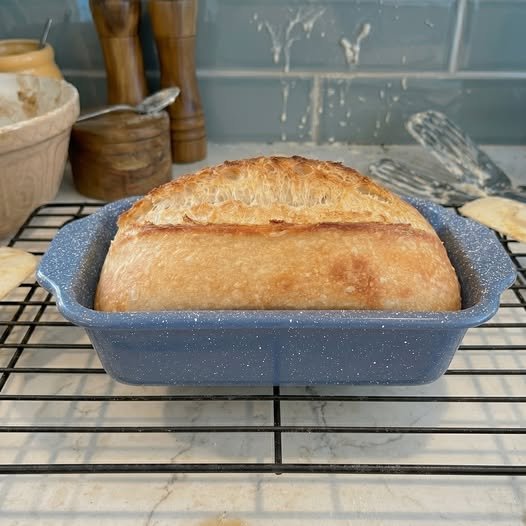
Ingredients
This recipe makes two medium sandwich-style sourdough loaves.
- 200 g active sourdough starter
- 700 g bread flour
- 500 g lukewarm water
- 20 g honey
- 15 g olive oil or softened butter
- 15 g fine sea salt
You will also need:
- 2 standard 9 × 5-inch loaf pans
- A large mixing bowl
- Kitchen scale
- Dough scraper
- Clean kitchen towel or plastic wrap
For the best results, use a sourdough starter that is active, bubbly, and capable of rising significantly after feeding.
Step 1: Prepare the Dough
Add the active sourdough starter and lukewarm water to a large mixing bowl.
Stir until the starter is mostly dissolved.
Add the bread flour and mix until no dry patches remain.
The dough will look rough and shaggy. That is perfectly normal.
Cover the bowl and allow the dough to rest for approximately 30 minutes.
This short rest gives the flour time to absorb the water and begins developing the gluten naturally.
Step 2: Add Salt and Fat
After the initial rest, add the salt, honey, and olive oil or softened butter.
Use your hands to squeeze and fold the dough until the ingredients are evenly incorporated.
The dough may initially feel slippery, but it will become more cohesive as you work with it.
You do not need to knead the dough continuously. Instead, use a series of folds.
Step 3: Strengthen the Dough
For the next two hours, perform a set of stretch-and-folds approximately every 30 minutes.
To perform a fold, wet your hands slightly, grab one side of the dough, stretch it upward, and fold it over the center.
Rotate the bowl and repeat on the remaining sides.
After several rounds, the dough should feel noticeably smoother, stronger, and more elastic.
If the dough already feels very strong after three sets, you can stop folding.
The goal is not to make the dough perfectly smooth. You simply want enough strength for it to hold its shape in the loaf pans.
Step 4: Bulk Fermentation
After the folds are complete, cover the bowl and let the dough continue fermenting at room temperature.
This stage can take approximately 4–8 hours in total, depending on the temperature of your kitchen and the strength of your starter.
Do not rely entirely on the clock.
Look for signs that the dough is ready:
- It has increased noticeably in volume.
- The surface looks slightly domed.
- You can see bubbles around the sides.
- The dough feels lighter and more aerated.
- It jiggles slightly when the bowl is moved.
You generally do not need to wait for the dough to double.
Step 5: Divide the Dough
Lightly grease two loaf pans with butter or oil.
Turn the fermented dough onto a lightly floured work surface.
Divide it into two approximately equal portions.
Try to handle the dough gently so you do not completely deflate it.
You can weigh the pieces for accuracy.
Step 6: Shape for the Loaf Pans
Take one portion of dough and gently flatten it into a rough rectangle.
Fold the top third toward the center, then fold the bottom third upward.
Roll the dough into a firm log, sealing the seam gently.
The finished piece should be approximately the length of your loaf pan.
Place it seam-side down into the greased pan.
Repeat with the second portion.
You do not need perfect shaping. The loaf pan will provide most of the support.
This is one of the biggest advantages of this method.
Step 7: Final Proof
Cover both loaf pans loosely with plastic wrap, reusable covers, or clean kitchen towels.
Allow the dough to proof at room temperature.
Depending on your kitchen temperature, this may take approximately 2–4 hours.
The dough should rise noticeably and become soft and puffy.
A gentle fingertip press can help determine whether it is ready. If the indentation slowly springs back, the dough is generally well proofed.
If it immediately springs back, give it more time.
If it collapses and remains deeply indented, it may have gone too far.
Step 8: The Overnight Option
If you want to make your baking schedule easier, the loaf pans can be refrigerated after shaping.
Cover them tightly and place them in the refrigerator overnight.
The following morning, remove them from the refrigerator and allow them to sit at room temperature while the oven preheats.
This method is particularly convenient because most of the work can be done the day before.
The cold fermentation also develops additional sourdough flavor.
Step 9: Prepare the Oven
Preheat your oven to 190°C (375°F).
Place a rack in the center of the oven.
Because the bread is baked directly in loaf pans, there is no need to preheat a Dutch oven or worry about handling a heavy, extremely hot pot.
This is another reason the two-pan method feels much less chaotic.
Step 10: Prepare the Loaves
When the dough is properly proofed, gently brush the tops with a little milk, water, or egg wash if desired.
For a simple rustic appearance, leave them plain.
You can also sprinkle the tops with sesame seeds, oats, sunflower seeds, or flaky sea salt.
If you want a classic sandwich-loaf appearance, use a sharp knife or bread lame to make one shallow lengthwise slash down each loaf.
The cut is optional because the loaf pans already help control the expansion.
Step 11: Bake
Place both loaf pans in the preheated oven.
Bake for approximately 35–45 minutes, depending on the size and shape of your loaves.
The tops should become golden brown.
If the tops are browning too quickly, loosely cover them with aluminum foil during the final part of baking.
For the most accurate result, the center of the bread should reach approximately 93–96°C (200–205°F).
Once baked, remove the pans from the oven.
Step 12: Cool Completely
Allow the loaves to cool in their pans for approximately 10 minutes.
Then carefully remove them from the pans and place them on a wire rack.
Allow them to cool completely before slicing.
This is an important step. Cutting sourdough while it is still extremely hot can result in a gummy interior because the crumb has not finished setting.
For the cleanest slices, wait at least one hour.
Why This Method Is Easier
Traditional sourdough baking often requires carefully shaping a boule, transferring it into a hot Dutch oven, scoring it quickly, and creating enough steam for good oven spring.
The two-loaf-pan method eliminates much of that stress.
The pans support the dough during its final rise and keep the loaves contained during baking.
You also get two evenly shaped loaves instead of one large round loaf.
That makes this method especially useful for families because one loaf can be eaten immediately while the other can be frozen.
Storage
Once completely cool, store the loaves in an airtight bread bag or container.
They are best enjoyed within several days.
For longer storage, slice the bread and freeze it.
Place parchment paper between slices if you want to remove individual pieces easily.
Frozen slices can go directly into a toaster.
Final Tips
The biggest secret to successful sourdough is learning to watch the dough rather than following the clock exactly.
Temperature affects fermentation dramatically. A warm kitchen can make the dough rise much faster, while a cool kitchen can slow everything down.
Use an active starter, give the dough enough time to ferment, and avoid adding excessive flour simply because the dough feels sticky.
Most importantly, don’t chase perfection.
The beauty of the two-loaf-pan method is that the pans do much of the shaping work for you. There is less transferring, less scoring anxiety, less risk of the dough spreading across your counter, and no need to wrestle with a scorching-hot Dutch oven.
Once you get comfortable with this method, homemade sourdough becomes much more approachable. You can mix the dough, let fermentation happen while you go about your day, shape it into two simple loaves, and bake them together.
The result is soft, flavorful homemade sourdough that is perfect for toast and sandwiches—and the whole process feels considerably more organized and far less chaotic.

