Ingredients
For the Pastry
- 500 g puff pastry, chilled
- 1 egg
- 1 tablespoon milk or water
- 1 tablespoon sesame seeds or nigella seeds, optional
- A little flour for dusting
For a Savory Chicken Filling
- 300 g cooked chicken, shredded or finely chopped
- 1 small onion, finely chopped
- 1 tablespoon cooking oil
- 1 teaspoon ginger-garlic paste
- 1 small green chili, finely chopped, optional
- ½ teaspoon salt, or to taste
- ½ teaspoon black pepper
- ½ teaspoon red chili flakes
- ½ teaspoon cumin powder
- ½ teaspoon coriander powder
- 2 tablespoons chopped fresh coriander
- 2 tablespoons mayonnaise or cream cheese, optional
- ½ cup grated cheese, optional
Preparing the Filling
Before working with the puff pastry, prepare the filling and allow it to cool completely. This is important because a hot filling can melt the butter in the pastry and prevent the layers from puffing properly.
Heat the oil in a pan over medium heat. Add the chopped onion and cook for several minutes until it becomes soft and lightly golden. Add the ginger-garlic paste and green chili, if using. Cook for another minute until fragrant.
Add the shredded chicken, salt, black pepper, red chili flakes, cumin powder, and coriander powder. Mix everything thoroughly and cook for 3–5 minutes so the flavors combine.
Turn off the heat and stir in the fresh coriander. If you want a creamier filling, add mayonnaise or cream cheese after the mixture has cooled slightly. You can also add grated cheese for a richer, cheesier pastry.
Transfer the filling to a plate and spread it out so it cools faster. Do not use the filling while it is hot.
Preparing the Puff Pastry
Remove the puff pastry from the refrigerator just before you are ready to work with it. Puff pastry needs to remain cold because its layers contain butter or another fat. When the cold pastry enters a hot oven, the moisture in the butter and dough produces steam, which separates the layers and makes the pastry rise.
Lightly dust your work surface with flour. Place the chilled pastry on the surface and gently roll it if necessary. Avoid rolling it excessively thin, because the pastry needs enough layers to rise properly.
Cut the pastry into rectangles or squares, depending on the shape you want. A rectangle approximately 10 × 15 cm works well for individual stuffed pastries.
Filling the Pastry
Place approximately 1–2 tablespoons of the cooled filling in the center of each pastry piece. Do not overfill it. Too much filling can make the pastry difficult to close and may cause it to burst during baking.
Leave a clear border around the edges. This empty space is important because it gives you enough pastry to seal the parcel.
If you are using cheese, you can sprinkle a small amount over the filling before closing the pastry.
Sealing the Pastry
Fold the pastry over the filling to create a rectangle or triangle. Press the edges together gently with your fingers.
For a stronger seal, use the back of a fork to press around the entire edge. This also creates an attractive decorative pattern.
If the pastry edges are not sticking together, lightly brush them with water before pressing them closed. Be careful not to put water on the top surface of the pastry because excess moisture can affect its crispness.
Place the finished pastries on a parchment-lined baking tray. Leave some space between each one because they will expand during baking.
Once all the pastries are assembled, place the entire tray in the refrigerator for approximately 10–15 minutes. This short chilling period helps the pastry remain firm and improves the final rise.
Preparing the Egg Wash
Crack one egg into a small bowl and beat it with one tablespoon of milk or water.
Using a pastry brush, lightly coat the top of each stuffed pastry with the egg wash. Avoid brushing heavily over the cut edges because too much egg wash can glue the layers together and prevent them from rising properly.
For additional flavor and decoration, sprinkle sesame seeds or nigella seeds over the egg-washed pastry.
Adding Steam Vents
Use a sharp knife to make one or two small cuts on the top of each pastry. These vents allow steam from the hot filling to escape.
Do not make very large cuts. Small vents are enough to prevent excessive pressure from building inside the pastry.
Baking the Stuffed Puff Pastry
Preheat your oven to 200°C (400°F). Make sure the oven is fully heated before putting the pastries inside.
Place the chilled tray in the center of the oven. Bake for approximately 18–25 minutes, depending on the size and thickness of the pastries and the performance of your oven.
During baking, the butter in the puff pastry melts and creates steam. This steam pushes apart the layers of dough, producing the characteristic flaky texture.
Avoid opening the oven repeatedly during the first 15 minutes. A sudden drop in temperature can interfere with the pastry’s rise.
The pastries are ready when they are well puffed and have a rich golden-brown color. The bottom should also be crisp and cooked rather than pale or soft.
If the tops become golden too quickly while the pastry still needs more time, reduce the oven temperature slightly and continue baking until the pastry is completely cooked.
Cooling and Serving
Once baked, remove the tray from the oven and allow the pastries to cool for approximately 5–10 minutes. The filling will be extremely hot immediately after baking, so allowing them to rest makes them easier and safer to eat.
Serve the stuffed puff pastry warm with ketchup, chili sauce, garlic sauce, mint chutney, or your favorite dipping sauce.
They make an excellent breakfast, afternoon snack, lunchbox item, party appetizer, or tea-time treat.
Helpful Tips for Perfect Puff Pastry
The most important rule is to keep the pastry cold. If the pastry becomes soft or sticky while you are assembling it, place it in the refrigerator for several minutes before continuing.
Always use a cool filling. Hot or watery filling can melt the pastry fat and make the finished product heavy instead of flaky.
Avoid overfilling. A modest amount of filling gives you enough room to seal the pastry securely and allows the pastry to rise around it.
Make sure the edges are properly sealed. If there are gaps, filling and steam can escape during baking.
Always preheat the oven. Puff pastry needs strong initial heat to create steam and establish its layers.
For an especially crisp bottom, bake the pastries on a preheated baking tray. However, handle the hot tray carefully.
Variations
You can easily change the filling according to your preference. For a vegetarian version, replace the chicken with cooked potatoes, peas, carrots, mushrooms, spinach, or mixed vegetables.
For a cheesy version, combine chicken or vegetables with mozzarella or cheddar cheese.
For a spicy version, add chopped green chilies, chili flakes, or a little hot sauce to the filling.
You can also prepare minced-beef puff pastry by replacing the chicken with cooked and seasoned minced beef.
For a simple potato filling, mash boiled potatoes with salt, black pepper, cumin, chili flakes, and fresh coriander before stuffing the pastry.
Storage
Baked stuffed puff pastries are best enjoyed fresh because the pastry is at its crispiest immediately after baking. Leftovers can be stored in an airtight container in the refrigerator for up to 2–3 days.
To restore their crispness, reheat them in a preheated oven or air fryer rather than a microwave. Reheating in the oven helps bring back the flaky texture.
Final Result
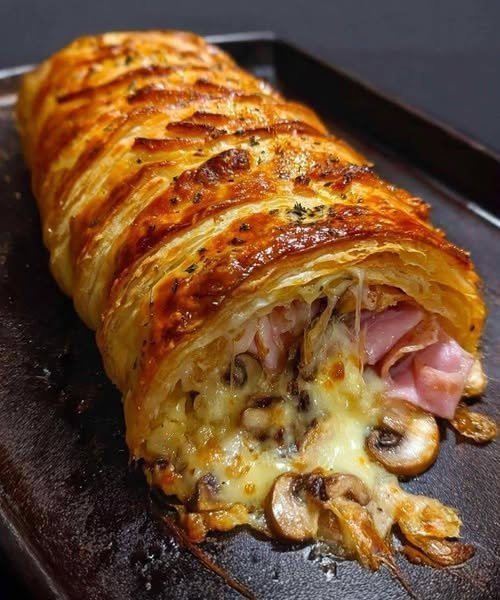
When properly prepared, stuffed puff pastry should have a crisp, golden exterior, clearly visible flaky layers, and a flavorful, moist filling inside. The pastry should be light rather than greasy, while the filling should remain securely enclosed.
With a cold pastry, cooled filling, careful sealing, proper chilling, and a fully preheated oven, you can make bakery-style stuffed puff pastries at home that are perfect for breakfast, snacks, parties, or family gatherings.

