Ingredients
- 500 g bread flour
- 350 g water, room temperature
- 100 g active sourdough starter, 100% hydration
- 10 g fine sea salt
- 10 g honey or sugar, optional
- Rice flour or semolina, for dusting
This makes approximately 970 g of dough, giving you 6 mini loaves of roughly 160 g each.
1. Get Your Starter Ready
For the best rise, use a starter that is active, bubbly, and close to its peak.
Feed your starter and let it rise until it has approximately doubled in volume and looks aerated throughout.
A small spoonful dropped into water may float, but don’t rely exclusively on the float test. A starter that has visibly risen strongly and smells pleasantly fermented is a better indication of readiness.
If your starter is sluggish, your mini loaves will be sluggish too.
2. Make the Dough
Add 350 g water and 100 g active starter to a large mixing bowl.
Mix until the starter disperses into the water.
Add the flour.
Mix with your hand until you have a rough, shaggy dough and no large pockets of dry flour remain.
Cover and let it rest for 30 minutes.
This initial rest allows the flour to hydrate and begins gluten development.
3. Add the Salt
Add 10 g salt and the honey or sugar if using.
Work the salt into the dough using your fingers.
You can pinch, fold, and squeeze the dough until everything is evenly incorporated.
The dough may initially feel sticky.
That’s normal.
Resist the temptation to dump in extra flour.
The dough becomes significantly stronger during fermentation and folding.
4. Bulk Fermentation
Cover the bowl and let the dough ferment at room temperature.
Depending on your starter and room temperature, this can take approximately 4–7 hours.
Don’t follow the clock blindly.
Look at the dough.
You want it to become:
- noticeably larger
- smoother
- slightly domed
- bubbly around the edges
- lighter and more elastic
- approximately 50–75% larger than when you started
For a warm kitchen, fermentation can happen much faster.
5. Stretch and Folds
During the first 2 hours of bulk fermentation, perform approximately 4 sets of folds, spaced about 30 minutes apart.
For each set:
Grab one side of the dough.
Stretch it upward without tearing.
Fold it over the center.
Rotate the bowl and repeat on all four sides.
After several rounds, the dough should become noticeably stronger.
By the final fold, it should hold its shape much better.
If the dough already feels very strong, you don’t need to keep aggressively folding it.
6. Divide Into Loaftinis
Once bulk fermentation is complete, lightly flour your work surface.
Turn out the dough gently.
Try not to completely deflate it.
Divide it into 6 equal pieces, approximately 160 g each.
Use a bench scraper to make clean cuts.
You now have six little dough portions ready to become your Loaftinis.
7. Pre-Shape
Take one portion and gently fold the edges toward the center.
Turn it over so the seams are underneath.
Using your hands or a bench scraper, gently drag the dough toward yourself across the work surface.
The friction creates surface tension.
Repeat with the remaining pieces.
Cover them and let them rest for 15–20 minutes.
This short bench rest allows the gluten to relax before final shaping.
8. Final Shape
Take one dough piece.
Gently flatten it into a small rectangle.
Fold the top third toward the center.
Fold the bottom third upward.
Then roll it gently into a compact little loaf.
Pinch the seam closed.
Place it seam-side down on parchment or in a lightly floured mini banneton.
Repeat for all six.
You can also shape them into small bâtards or round boules depending on the look you want.
9. Cold Proof
Cover the shaped loaves.
Place them in the refrigerator for approximately 8–16 hours.
This slow fermentation develops flavor and makes the dough easier to score.
It also gives you the convenience of preparing the loaves at night and baking them the next day.
10. Prepare for Baking
The next day, heat your oven to 230°C / 450°F.
If you’re using a Dutch oven, baking steel, or covered baking vessel, preheat it thoroughly.
Cold dough is easier to score, so take the loaves directly from the refrigerator.
Place them on parchment.
Dust lightly with flour.
11. Score
Use a razor or bread lame to make one confident slash along the top.
Because these are mini loaves, don’t make a huge complicated pattern.
A simple angled slash works beautifully.
The cut gives the loaf somewhere controlled to expand during baking.
12. Bake
If using a Dutch oven, bake with the lid on for approximately 12–15 minutes.
Then remove the lid.
Reduce the oven to 215°C / 420°F and continue baking for another 10–15 minutes, until deeply golden brown.
For six loaves, you may need to bake in batches depending on the size of your Dutch oven.
If using a standard oven without a Dutch oven, introduce steam during the first part of baking and bake until the loaves are deeply browned.
The crust should be properly colored rather than pale.
13. Cool
This is the difficult part.
Don’t cut the loaves immediately.
Transfer them to a wire rack and let them cool for at least 45–60 minutes.
The crumb continues setting as the bread cools.
Cutting too early can make the inside seem gummy even when the loaf was baked correctly.
🌟 Your Finished Loaftini
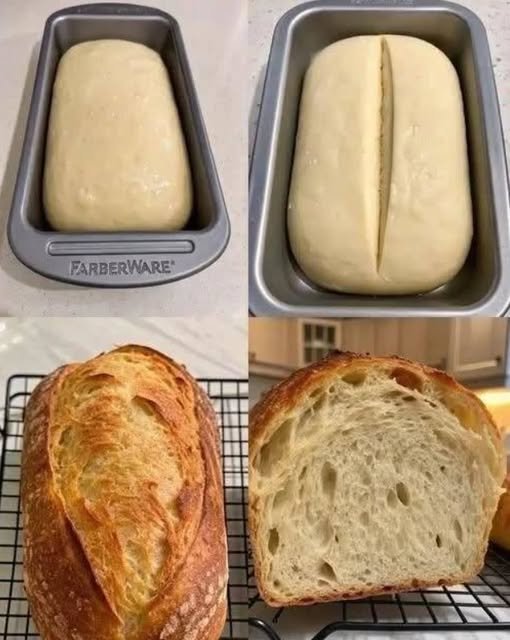
You should end up with a tiny sourdough loaf with:
CRISP CRUST → CHEWY CRUST → SOFT AIRY CRUMB → SLIGHTLY TANGY FLAVOR
They’re fantastic for:
- butter and honey
- sandwiches
- breakfast toast
- mini grilled cheese
- avocado toast
- soup dipping
- little breakfast rolls
- gifting
🔥 Level-1000 Tips
For bigger holes
Don’t aggressively degas the dough during shaping.
Handle it gently and preserve as much fermentation gas as possible.
For a thinner, crispier crust
Bake with strong steam at the beginning and give the loaves enough uncovered time at the end to thoroughly brown.
For more sourness
Extend the cold proof toward 16–24 hours.
For a softer sandwich-style loaf
Add the optional honey and bake slightly less aggressively.
For extra-crunchy crust
Skip the honey, bake until deeply browned, and allow the loaves to cool completely uncovered on a rack.
Don’t add flour just because the dough feels sticky
Sticky dough doesn’t necessarily mean something went wrong.
The gluten strengthens through fermentation and folds.
Adding lots of flour can turn these beautiful little loaves dense.
🕐 Easy Overnight Schedule
8:00 AM: Feed starter
12:00 PM: Mix dough
12:30 PM: Add salt
1:00–3:00 PM: Stretch and folds
3:00–6:00 PM: Finish bulk fermentation
6:00 PM: Divide and pre-shape
6:20 PM: Final shape
6:30 PM: Refrigerate
Next morning: Score and bake
Breakfast: Fresh sourdough Loaftinis. 🍞
The key is to watch the dough rather than the clock. Temperature, starter strength, flour, and fermentation speed can change the timing considerably.

