Ingredients
For the brown butter
- 170 g unsalted butter
For the cookie dough
- 150 g dark brown sugar
- 75 g granulated white sugar
- 1 large egg, approximately 50 g without the shell
- 60 g sourdough discard, preferably 100% hydration
- 2 teaspoons vanilla extract
- 250 g all-purpose flour
- ¾ teaspoon baking soda
- ½ teaspoon baking powder
- ¾ teaspoon fine salt
- 200 g chopped dark or semi-sweet chocolate
- 100 g chocolate chips
- Flaky sea salt, for finishing
Before You Start
The sourdough discard in this recipe is there primarily for flavor, tenderness, and complexity, rather than to make the cookies rise like bread. Use discard that smells pleasantly tangy, fermented, or mildly fruity. If it has been sitting in your refrigerator for several days, that’s completely fine as long as it has been stored properly and doesn’t show signs of spoilage.
For the chocolate, don’t rely exclusively on tiny chocolate chips. Chopped chocolate is what gives these cookies those dramatic molten pools. A combination of chopped chocolate and chips gives you both puddles and little pockets of chocolate throughout the cookie.
Step 1: Brown the Butter
Place the 170 g of butter in a light-colored saucepan or skillet over medium heat.
Allow it to melt completely. Once melted, the butter will begin to foam. Continue cooking, stirring or swirling the pan frequently.
You’ll eventually notice the foam becoming more golden and the smell changing from buttery to intensely nutty, toasted, and caramel-like.
Look underneath the foam. You should see little brown milk solids collecting on the bottom of the pan.
Once those solids become a rich golden-brown color, immediately remove the pan from the heat.
Pour the butter into a large mixing bowl, making sure you scrape every last browned milk solid into the bowl. Those little brown particles contain an enormous amount of flavor.
Let the butter cool for approximately 10–15 minutes.
You don’t want it completely solid, but you also don’t want it hot enough to cook the egg later.
Step 2: Mix the Sugars
Add the dark brown sugar and granulated sugar to the cooled brown butter.
Whisk vigorously for about 1–2 minutes.
The mixture should become glossy and cohesive.
The dark brown sugar contributes moisture and a deeper molasses flavor, while the white sugar helps the cookies spread and gives the edges their characteristic crispness.
This combination is important. Using only white sugar tends to produce a thinner, crisper cookie, while using only brown sugar can make the cookie softer and heavier.
Step 3: Add the Wet Ingredients
Add the egg, sourdough discard, and vanilla extract.
Whisk everything together until smooth.
At first, the mixture may look slightly separated or unusual because of the sourdough discard. Keep whisking. It should eventually become relatively smooth and glossy.
The vanilla should smell noticeable at this point, but the sourdough should not overpower the mixture.
If your discard is extremely liquid, that’s okay. The dough will be balanced by the flour later.
Step 4: Mix the Dry Ingredients
In a separate bowl, combine:
- 250 g all-purpose flour
- ¾ teaspoon baking soda
- ½ teaspoon baking powder
- ¾ teaspoon fine salt
Whisk thoroughly so that the leavening agents and salt are distributed evenly throughout the flour.
This matters because you don’t want one cookie receiving a concentrated pocket of baking soda.
Step 5: Combine Everything
Add the dry ingredients to the brown-butter mixture.
Using a spatula or wooden spoon, gently fold everything together.
Do not aggressively beat the dough.
Stop mixing when you still see a few tiny streaks of flour.
Add the chopped chocolate and chocolate chips.
Fold again just until everything is evenly distributed and there are no obvious dry pockets.
The finished dough should be thick, soft, and slightly sticky.
Don’t panic if it seems softer than ordinary refrigerated cookie dough. The flour will continue absorbing moisture while the dough rests.
Step 6: The Sourdough Rest
This is where these cookies go from good to ridiculous.
Cover the bowl tightly and refrigerate the dough for at least 4 hours.
However, if you have the time, refrigerate it for 12–24 hours.
The longer rest allows the flour to hydrate and gives the flavors time to develop. The sourdough contributes a subtle fermented complexity, while the brown butter and brown sugar become more pronounced.
You can also freeze the dough.
For the ultimate cookie, scoop the dough into individual portions first, then freeze them on a tray. Once frozen solid, transfer them to an airtight container or freezer bag.
Step 7: Shape the Cookies
When you’re ready to bake, divide the dough into approximately 65–75 g portions.
Roll each portion loosely into a ball.
Don’t obsess over making them perfectly smooth. Slightly irregular dough balls often produce more interesting wrinkles and ridges around the edges.
For an especially thick bakery-style cookie, make the dough balls tall rather than completely flat.
Press a few extra pieces of chocolate into the top of each dough ball.
This isn’t necessary for flavor, but it gives you those beautiful pools of melted chocolate on the surface.
Step 8: Prepare the Oven
Preheat your oven to:
180°C / 350°F
Line a baking sheet with parchment paper.
Arrange the dough balls with plenty of space between them.
For most ovens, baking 6 cookies at a time is safer than overcrowding the tray.
If the dough has become warm while you were shaping it, put the tray back into the refrigerator for 15–20 minutes before baking.
Cold dough helps the cookies maintain a thicker center.
Step 9: Bake
Place the cookies in the fully preheated oven.
Bake for approximately 10–13 minutes.
Start checking them around the 10-minute mark.
The edges should be visibly golden brown and slightly crisp.
The centers should still look soft and somewhat underdone.
This is crucial.
Do not bake them until the centers look completely finished.
If you wait until the middle looks fully baked in the oven, the cookies will usually become overbaked after they cool.
The residual heat from the baking sheet will continue cooking the centers.
Step 10: Finish Them Properly
As soon as the cookies come out of the oven, sprinkle each one lightly with flaky sea salt.
If you want perfectly round cookies, immediately place a large round cookie cutter, bowl, or glass around each cookie and gently swirl it against the edges.
This pushes the spreading cookie back into a neat circle without flattening it.
Let the cookies remain on the baking sheet for approximately 10 minutes.
During this time, the edges will firm up while the centers remain wonderfully soft.
Then transfer them to a cooling rack.
If you’re capable of waiting, give them another 10 minutes.
If you’re not capable of waiting, I completely understand.
The Texture You’re Looking For
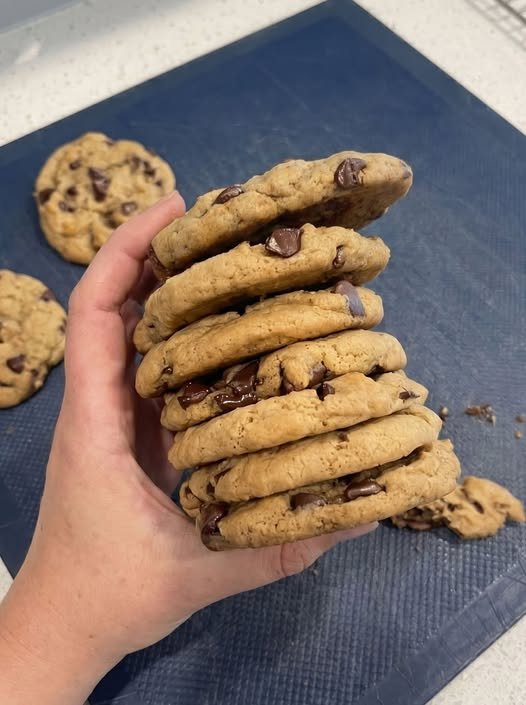
A perfect cookie from this recipe should have several textures happening at once.
The outside edge should be crisp and deeply caramelized.
Moving toward the middle, it should become chewy and dense.
The very center should remain soft and almost fudgy.
The chocolate should be melted rather than merely warm.
The brown butter should provide a toasted, nutty flavor, while the sourdough adds a quiet tang underneath the sweetness.
The flaky salt brings everything together.
The Frozen-Dough Method
For an even more dramatic cookie, freeze the shaped dough balls.
Place them on a parchment-lined tray and freeze until solid.
Transfer them to an airtight freezer container.
When you’re ready to bake, don’t thaw them.
Place the frozen dough directly onto the parchment-lined baking sheet.
Bake at 180°C / 350°F, adding approximately 2–4 minutes to the normal baking time.
Keep watching the edges rather than relying exclusively on the clock.
This method tends to produce a particularly thick center because the outside has time to brown before the middle completely cooks.
Five Rules for Level-1000 Cookies
1. Brown the butter properly.
The brown milk solids are where much of the magic happens. Don’t stop when the butter merely melts.
2. Don’t skip the resting period.
Four hours works. Overnight is better.
3. Use chopped chocolate.
Chocolate chips are great, but chopped chocolate creates those enormous melted pools.
4. Pull the cookies early.
Soft centers are intentional. They aren’t underbaked by accident.
5. Finish with flaky salt.
A tiny amount of salt on top balances the sweetness and makes the chocolate taste more intense.
Storage
Keep completely cooled cookies in an airtight container at room temperature for approximately 3–4 days.
For the best experience, warm one in the microwave for about 10–15 seconds before eating. The chocolate softens again and the center becomes wonderfully gooey.
You can also freeze the shaped raw dough for several weeks. Bake individual portions whenever you want fresh cookies.
Final Formula
If you want the shortest possible version of the method:
Brown butter → cool → whisk with sugars → add egg, sourdough discard, and vanilla → fold in dry ingredients → add chocolate → chill overnight → portion → bake at 180°C / 350°F until edges are golden and centers are soft → flaky salt → rest 10 minutes → destroy immediately.
That combination of brown butter + sourdough + dark brown sugar + chopped chocolate + overnight rest + flaky salt is the core of the recipe.
The goal isn’t a cookie that’s merely sweet and chocolatey.
The goal is a cookie that tastes like a chocolate chip cookie, salted caramel, toasted nuts, and sourdough fermentation all decided to become one thing.

